
Introduction to Surfing
Surfing is accessible. Anyone can learn to have fun without too much effort. Getting to the beach can sometimes be the only hassle. But once you’re there, you can surf as many waves as you want! All you need is a surfboard and maybe a wetsuit. Nature will provide the rest.
You don’t need a track, fences or chalk lines. Surfing is about freedom! It’s about playing with nature. The ultimate team-mate and the best teacher.
However, don't take things for granted. You will not be able to surf simply because you’re a sporty person, love the ocean or enjoy the outdoors. Yes, learning the basics of surfing is easy. But developing advanced skills requires commitment.

This is precisely why The Surfer Kids uses surfing as a vehicle for empowerment. Surfing teaches the children in our Core Surf Program commitment and with that they can rise above the limitations of their circumstances and create a better life for themselves.

These surf tips are only meant to deepen your understanding. It's not a replacement for professional help. You will learn faster if someone can teach you the basics. Book a surf lesson, go on a surf trip or become friends with a good surfer.
The information presented here is based on several years' experience and was written by The Surfer Kids' coaches themselves. We provide this information free of charge because we've witnessed the transformative power of the ocean. That being said, we are a non-profit organization. We work with poor communities and we rely on donations to fund our operations. If you find this information valuable, and you've experienced the power of the ocean for yourself, please consider making a donation.
Your donation will help us to continue the work that we do, empowering children through surfing. For more information check out our Core Surf Program and read more about The Surfer Kids Non-Profit Organization.

The Very Basics of Surfing
Without catching waves you can't surf. Catching waves is the first step in surfing and it's absolutely vital. And if you want to catch waves you'll need to lie on your surfboard and paddle. So the first thing we need to talk about is how to properly lie on a surfboard. It sounds simple, but it's the single most common beginner mistake.


Lying on the Surfboard
You start with lying and finding your balance on the surfboard. The board should float at more or less the same angle, whether you're lying on it or not.
The most common beginner mistake is lying too far back on the board. You’ll notice that if you float your board in calm water, without lying on top of it, the board’s nose (front end) will be at a certain angle, relative to the water’s surface.
When you lie on the board, make sure that the angle of the board’s nose, relative to the surface of the water, is the same as when you weren't lying on it. The nose should not be sticking up into the air more than what it did when you weren’t on top of the board.
You don’t want to lie too far forward either. Lying too far forward will make the board’s nose dig into the water. Move slightly back on the board to avoid scooping up water with your board’s nose.
Paddling & Catching Waves
Make sure to paddle with a crawl stroke and not with both arms simultaneously. This will ensure that your board keeps a constant speed and doesn’t slow down when paddling. Keep your chin up so you can look around. Our Core Surf Program coaches call this “lying like a banana” because that’s the shape you should make with your upper body.
You’ll need to paddle straight toward the beach and look straight ahead as you’re paddling to catch a wave. But you’ll also need to glance around and look back at the wave. While paddling keep your feet together and push your sternum (chest bone) into the board.
To catch an unbroken wave you need to be paddling at the same speed as what the wave is traveling. And bigger waves travel faster. So try not to surf the biggest waves you can find. You probably won't be able to catch them anyway. And if there are more advanced surfers in the water you'll likely get in the way.
If you’re a total beginner, it’s best to learn by first catching a few broken waves. Catching a 'foamie' or 'whitewash' is relatively easy. Lie on your board with the nose pointing straight to the beach and paddle until the wave catches up with you. You'll feel the wave pushing you toward the beach.
If you're a beginner, it's much easier to do this with some assistance. The newest children in our Core Surf Program are always assisted at the beginning and the coaches help them to catch their first waves.
Catching an unbroken wave is more difficult. You need to be in right place at the right time. If you’re too far out the wave will pass underneath you. It won’t be steep enough for you to push yourself down the wave face. However, if you’re too close to the beach the wave will break on top of you. It is not recommended that you try this until you've built up some experience.
We abide by the same guidelines. We train the newest kids by helping them to catch broken waves. Only much later do they advance to catching unbroken waves on their own. This ensures everyone’s safety and helps the children to progress faster.
To be able to accurately judge when to catch a wave requires a lot of experience. You need to sit and wait in the right spot and start paddling at the right time. In the beginning you’ll miss most waves. But with experience you’ll learn to accurately judge in advance exactly where the wave will break. This will enable you to start paddling at the right moment.
When trying to catch a wave, never stop paddling. It’s a very common beginner’s mistake to stop paddling too early and try to stand up before actually riding the wave. When you feel the wave lifting you up, you haven't actually caught it yet. It's only when you feel yourself sliding down again that you're caught it. You’ll feel when this happening. It’s a very distinctive feeling. Do not try and stand up before you feel this.
Once you’re familiar with the feeling of catching a wave, the aim is actually to stand up just before that moment of sliding down. You actually want to stand up at the precise moment when you’ve caught the wave.


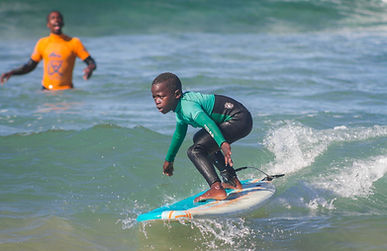


Pop-Up: Learning to stand up!
First catch the wave. Once you're actually riding the wave, place your hands underneath your shoulders, palms down, as if you were going to do a push-up. Lift your shoulders by pushing on the board until your arms are almost straight. However, you are not doing a full push-up. Your back should be curved with your legs and hips still lying almost flat on the board.
Ideally you need to ‘sweep’ your feet in underneath your body, in one smooth movement, as you push your shoulders up. This called a 'pop-up' and it's how advanced surfers get to their feet.
But this can be difficult for beginners. If you can’t do it in one movement, break it down into parts, but always remember that eventually your aim is to do a smooth ‘pop-up’ and get to your feet in one motion. Breaking it down into parts must only be a intermediary step.
If you need to break this into parts, avoid using your elbows on the surfboard. Always start with your hands firmly underneath your shoulders. NEVER use your elbows to lift your shoulders.
Avoid using your knees. After you’ve pushed your shoulders up and your arms are almost straight, bring your back foot slightly forward and step it onto the board. Then use your back foot to push yourself forward and up, stepping your front forward and between your hands.
Turn your hips so that you are aligned with the stringer (the line running down the middle of your surfboard) and only AFTER you’ve turned your hips let go with your hands and stand up fully. Do not lift your hands up from the board before you’ve turned your hips. It's a very common beginners’ mistake to try and turn the hips after standing up. If you do this, nine times out of ten, you will lose your balance and fall.
Once you’re standing make sure your feet are on the stringer (the middle line of the board), toes on one side, heel on the other. Your back foot should be at a 90 degree angle to the stringer while the front should be at a 35 - 45 degree angle. Your back foot should be somewhere near where the board’s fins are underneath the board, while your front foot should be between half-way to two-thirds toward the front of the board. If you were lying in the correct position to begin with your front foot should be where your chest was while lying on the board.
However, if you’re surfing a bigger beginners board you should be standing slightly further forward, roughly in the middle of the board. Your weight should be centered along the stringer, as if you’re balancing in a sideways position while standing on a tight-rope.
Remember to keep your body low. ALWAYS bend your knees. If you stand up straight you will fall. Your feet should be at least shoulder-width apart, but preferably slightly wider than that, and allow your knees to bend inward.
Keep your arms relaxed, but keep them up for balance. Keep your upper body relaxed, but do not slouch. Your muscles need to be relaxed, but alert. Keep your front hand within your line of sight and always look up! If you look at your feet you will fall down!
The children in our Core Surf Program speak isiXhosa as their mother language and there are some phrases that we constantly repeat. The first is “gobi dolo” which means "bend your knees" and another very common phrase is “jonga phambili” which means "look forward".
These are perhaps the two most important rules of surfing: If you don't bend your knees you will fall. And where you look, that's where you'll end up going. Which also means that if you look down, inevitably you'll fall.
In other words, bend you knees and look forward. Gobi dolo jonga phambili !!!
Your First Surfboard
Nothing is more important to the beginner than choosing the right board to learn with. Small professional boards look cool and exciting, but you won’t master the basics of surfing on a board like that.
Your first board should be cheap. While learning how to surf you’re going to ding and scratch your board. So don’t spend too much on your first board.
Don’t worry too much about smaller details like tail shape or the number of fins on your surfboard, these won’t matter too much for learning the basics. All that really matters with your first board is its volume relative to your weight.
More volume equals better flotation and you need something that will float you easily, to quickly learn the basics of paddling, catching and riding waves.
However, avoid getting a board that is huge. Massive boards can be easier to stand up on, but your board shouldn't be so big that you cannot handle it on your own in the water.
In our Core Surf Program every child starts on a soft surfboard. It’s big, buoyant, stable, easy to catch waves with and easy to stand up on.
The children then slowly progress towards smaller, shorter and more advanced boards. Everyone has a different learning curve, so find your own pace and don't rush into upgrading to a smaller board. It will take a while. Even the fastest learners need time. In our Core Surf Program we train the kids for about a year before they progress to surfing more advanced surfboards. And that's taking into consideration that our Core Surf Program runs 5 days a week with average of 3 surf training sessions a week.
Ideally you want a board that is about the same length as you would be if you stretched your arms out above your head. For the average person that would mean a surfboard that's approximately 8ft long. Look for a board that is thick and wide. Thickness adds a lot of volume, which makes paddling easier, while a a wider board will be more stable, making it easier to balance.


.jpg)


Riding A Wave
Once you’ve learned how to paddle, how to catch a wave, and how to stand up on a surfboard, it’s time to focus on wave riding.
At first you will have to ride whitewash waves straight to the beach. Learning to surf straight in the foam should be your first priority. However, eventually the aim is to ride on the unbroken face of the wave, not in the foam.
While paddling, just before catching an unbroken wave, angle your board along the open face, going either left or right, and ride the wave at an angle, at about a 45 degree angle to the parallel lines formed by the shoreline and the wave. This is called surfing down the line, as you’re literally riding down the line of swell as it forms into a breaking wave. This way you’ll get the longest ride possible with the greatest amount of speed.
Wave riding begins before you catch the wave. You should decide which direction (right or left) you will ride as you begin paddling for an oncoming wave. And once you're up remember our Core Surf Program coaches' advice: bend your knees and look in the direction you want to go. "Gobi dolo and jonga phambili!"
The most critical part of the wave is there where the wave face is steepest. That’s where the wave is about to break into a whitewash, but hasn’t actually broken yet. That’s where you will want to surf because that’s where you’ll have most fun!
You don’t want to surf in the foam as it’s not possible to generate much speed in the whitewash. Surf away from the foam. However, don’t surf too far down the line and too far away from the foam, because you’ll also surf away from the wave's power source, called the "pocket" of the wave. This will cause you to lose speed and also lose the wave. Stay as close to the pocket as possible.
On flatter waves more suited for beginners, you’ll have to alternate between surfing down the line and straight to the beach, in order to stay in the critical part of the wave.
If you keep surfing down the line only, pretty soon the wave will pass underneath you and you will go over the back. If you only surf straight to the beach the pocket will run away from you and you’ll end up stuck in the foam.
So you’ll need to turn your board in order to stay on the wave, alternating between going sideways (down the line) and straight (toward the beach). This is how advanced surfers generate speed, by surfing top-to-bottom, or rail-to-rail. And it involves turning the board.
Turning The Board
Once you’re up, riding a wave is all about turning the board. The technique of turning the surfboard is relatively simple. While keeping a low center of gravity (bending your knees) lightly lean your weight in the direction you want to go, but always try to keep your body centered over the midpoint of your board. This will push the rail of the surfboard into the water and create a keel effect, cutting into the water and directing the board in that direction.
Turning a surfboard starts with your eyes. Wherever you direct your eyes your body, and eventually your board, will follow. So start by looking where you want to go.
It’s important to remember that for beginners turning a surfboard is a very slow process. There are no fast turns, not until you’ve progressed to surfing a much smaller board and bigger, more powerful waves.
In The Surfer kids' Core Surf Program when the kids have progressed to doing turns it’s time for them to move towards the back line. That’s where the bigger and stronger waves break, which will allow for doing turns. Doing turns isn't possible on the smaller waves where you learn the basics.
However, it takes a lot of time and commitment to progress to this point of paddling deeper, surfing bigger waves and doing proper turns.
Our Core Surf Program runs 5 days a week all year around. The aim is for the children to learn surfing at an advanced level, surfing bigger waves at the back line and doing big turns. This is how they learn commitment and that's ultimately what creates empowerment, because the same principles apply in everyday life. Commitment is a prerequisite for success. And because it takes serious commitment to progress to this advanced level of surfing, we know they've also learned commitment the process.
On average, with our Core Surf Program running 5 days a week, all year round, it takes between three and four years before the children reach a truly advanced level where they can surf serious waves and do real turns. And by the time they've reached this level, their chances of achieving success in life (despite the limitations of their circumstances) have also increased dramatically.
Ultimately this is where you want to progress to when learning how to surf. Turning the board is what really makes surfing fun!
When turning lean into your turn and keep it there. It will probably take a few seconds before the board starts turning with you. And don’t wiggle your body. This will not help. You need to lean your entire body-weight in one direction and keep it there if you want the board to follow your weight.
Once you’re cruising down the line, turning easily, you’ll want to surf the best waves possible! But finding those waves can be tricky. You’ll need to understand how and why waves break.
So keep reading!


Understanding Waves
The ocean is always changing and there are various factors that give shape to waves. Great waves are miracles of nature as there are so many different factors that need to be just perfect for excellent waves to form.
Every surf spot is different, and generalising is difficult, but there are four main factors that you’ll always have to consider at every surf spot.
-
Swell
-
Wind
-
Tide
-
Shape of the Shoreline

The Surfer Kids is based permanently at Diaz Beach in Mossel Bay, South Africa. It’s a beach break which makes for less consistent waves than a reef or point break, but it ensure a much safer surfing experience for the youngest and least experienced children in our Core Surf Program.
Mossel Bay also has different reef breaks and point breaks where the more advanced children sometimes surf. And ultimately that's our aim. To coach the children in our program to an advanced level of surfing, so as to empower them with the commitment they learn in the process.
Sometimes this means finding good waves and surfing at different surf spots, which involves checking the forecasts, understanding how waves work and being familiar with different types of surf spots.


Swell
As winds blow over the surface of the ocean, friction between air and water transfers energy from the wind into the ocean. This is how swell is generated.
To visualise this, take a deep breath exhale over a flat surface of water in a small container. Ripples will form. These ripples are the origin of all swell.
Generally speaking if a wind blows at a speed of 100 km/h, over a distance of 100 km, without changing direction, the swell generated would be one meter high. It is not only the strength (speed) of the wind but also its consistency that matters. In order to form swell, a wind cannot change direction erratically. If it does, the energy transferred into the ocean will be moving in different directions and there will be no continuous swell build-up.
Big swells are generated by strong winds, usually storm systems, far out in the open ocean. Sometimes thousands of kilometres from the shore. This type of swell is called ground-swell. Because the swell is bigger and formed further away, it has spent more time interacting with the ocean floor. Hence the name ‘ground’ swell.
Swell can also be formed by winds closer to shore. This type of swell is called wind-swell and it’s usually smaller and less consistent.
The names should not cause confusion, as all swell, both ground-swell and wind-swell, is ultimately formed by wind.
Learning to understanding the ocean is a very important part of our Core Surf Program. The more experienced children can tell, just by looking at how the waves break, if it’s going to be a great session or if it’s maybe too dangerous to surf at all.
Learning to 'read' the ocean is without a doubt the most difficult part of learning how to surf. It takes years to acquire this skill and only the most advanced surfers can do this. This is a core part of the reason why surfing works to teach commitment.
We know that our Core Surf Program works. We can prove that it teaches commitment. We've seen it in the data that we collect. And it makes sense. Paddling, catching waves and even riding unbroken waves down the line and doing turns, these skills can be learned in less than a year. But learning to speak nature's language, this takes time. Anyone who's learnt to do that, could only have done so by being totally committed. And, transferring that understanding to life, it's a simple observation that no person has ever achieved success without first being committed to their cause.
This is how and why our Core Surf Program works.
Swell Direction
Swell direction is vitally important because a certain spot will always produce the best waves with a certain swell direction. Some spots work on different swell directions, but there will always be an optimal scenario that is almost guaranteed to produce good waves.
As with wind, swell is named for its point of origin. An easterly swell originates from the east. To surf the best waves possible you need to know how different swell directions impact upon a particular surf spot. But there’s no formula to calculate this with. Experience and local knowledge is the only way of knowing which swell direction works best for a particular spot.
When you surf good waves, find out what kind of swell produced those waves and make a mental note. Observe the spot over time and speak to the locals.
.jpg)


Swell Height & Period
It’s good to know how big the waves are going to be. Some surf spots become un-surfable above a certain size while other spots need a minimum size to start producing waves.
Swell height is either measured in feet or metres and swell period in seconds. Swell height measures the height of one swell, from top to bottom, (trough to crest) while the period of a swell is the amount of time that passes between consecutive swells. These measurements come from offshore buoys and are usually given as averages.
Both these numbers are important when judging the eventual quality of waves at any particular surf spot. Swell size is relatively straight forward. A bigger swell means bigger waves.
Swell period is a little more complex.
Simply put, swell with a longer period has travelled further to reach shore. Not only that, but as swells travel through the ocean they line up. Meaning that swell with a longer period will come in long straight lines. Such organised swells travelling together in straight lines usually mean better waves.
As always, experience is key. Observe a spot over time and speak to the locals. This way you will learn to judge the eventual size of the waves based upon a simple forecast.
Wind
As explained earlier swell is generated by wind. But this happens far from shore. A good swell however does not always guarantee good waves. Good waves require favourable local winds, the wind blowing at the surf spot where the swells break to form surfing waves.
Here a sharp distinction is made between offshore and onshore winds.
If you are standing on the beach, facing the ocean, and the wind is blowing into your face, it is an onshore wind. The wind is blowing from the ocean onto the shore. An onshore wind is almost always bad for waves. It makes the waves choppy and messy. Instead of breaking cleanly, breaking swells begin to crumble and become flat. Onshore winds blow from behind the oncoming swell thereby pushing them down.
Onshore winds aren’t too bad if you’re still learning, but for advanced surfers onshore wind is almost never favourable.
At The Surfer Kids we try to teach these core elements to our attending children as well. To do so, we use a variety of different weather apps to look at all the factors that influence the waves. Especially for the kids who’ve been in our program for a few years this information is interesting and important. As an intermediate or advance surfer you must be able to read the forecast correctly in order to see if the next couple of days will be favourable for surfing or not. Once you’ve progressed from a beginners level and move on to unbroken or “green” waves this information becomes vital!
What you want is ‘clean’ surf. Clean waves are fanned by light offshore wind, or no wind at all. Offshore wind blows from the shore onto the ocean.
When the wind is offshore, or there is no wind at all, waves are smooth and without any bumps or chop, which makes for a good smooth ride. Light offshore winds, winds that blow into the oncoming waves, groom waves by lightly holding them up before they break. Light offshore winds are great for surfing!
Strong offshore winds can also easily spoil waves. Certain spots, and big strong swell, can handle a lot of offshore wind, while other spots, and small swell, cannot handle any wind at all.
Also some spots are sheltered from certain local winds, which is good if the wind would otherwise spoil the waves.
Winds that aren’t directly off- or onshore are usually referred to as cross-shore winds. This can be great for windsurfing or kite surfing, but only rarely does a cross-shore wind increase the quality of the waves for surfing. If a cross-shore wind is anything more than a light breeze, chances are it will spoil the waves somewhat.


Tides


Contour Of The Ocean Floor & Shape Of The Shore Line
Swells break to form ridable waves when the water through which the swell is travelling becomes too shallow to accommodate the energy of the swell. Swells rise above the surface of the water once their energy is pushed up by the ocean floor in shallower water. Only when swells ‘break’ are ridable surfing waves formed.
As the energy of a swell is pushed further and further above the surface of the water a ‘water-structure’ is formed. These are usually visible as an unbroken swell lines travelling towards the shore. As the water gets shallower, the swell line becomes more visible as the water structure is pushed higher above the surface.
Tension starts building.
Swells ‘break’ when the built up tension becomes too much for the water structure to handle. At that moment the water structure of the swell will collapse in on itself, forming a breaking wave. Generally swells break to form waves when they reach a depth of one-and-a-half times their own size. A two-metre swell will start breaking in three metres of water.
The shape of a wave, and the way it breaks, is largely dependent upon the contour of the ocean floor. If the water changes depth suddenly, waves will break suddenly, causing a very hollow and sometimes dangerous wave. If the water changes depth gradually, waves will break gradually and gently. These are usually the best spots for beginners. As you gain experience you will be able to tell a lot about the ocean floor by simply looking at the waves.
The contour of the ocean floor also determines whether a wave will break left, right or all at once, which is a close-out. Swell direction can also impact this, but for the most part, if the water depth does not change at an angle, relative to the incoming swell, a wave will close-out, meaning that the entire swell will break all at the same time. This is not ideal for surfing.
To properly surf a wave down the line you need a wave that breaks a little bit a time. This will either happen from left to right or vice versa, from right to left.
Depending upon the composition of the ocean floor and the shoreline in general, surf spots can be broken down into three broad categories.
Tides are an important factor in the perfect wave equation. The quality, speed, size and very existence of a wave will sometimes depend entirely on local tides. For this reason it is important to factor in the tide cycle to predict good waves at any particular surf spot.
Some spots work better on high tide and others on low tide. Some spots work better on a pushing tide while others work better while the tide is going out. Some spots only work on a spring low or spring high, when the moon is full or new.
At Diaz Beach where The Surfer Kids operate it also depends whether you are a beginner or a more advanced surfer. With our smaller kids, who mostly ride whitewash waves, we surf on a low tide. On a low tide at Diaz Beach the waves break further in the back and ensure a longer, safer ride through the shallow waters. If we surf with the more advanced Surfer Kids the best time to surf is roughly two hours before or after the high tide.
It all depends on the interaction between the tidal cycle and the bottom contours of the shoreline. Again local knowledge and observation is absolutely crucial! At some spots good waves will completely disappear with a certain tide.
Basically tides affect the depth of the water. This will either hide or expose the ocean floor, and ultimately it is the ocean floor’s contours that make swells break into ridable waves.


Beach, Point And Reef Breaks


Beach waves break over a sandy bottom, generally within about 100 meters or less from the shoreline. Waves at beach breaks can change overnight. It all depends on the shifting sand banks. Currents, storms, tidal effects and even man-made structures can affect sand-banks.
The Surfer Kids operate at Diaz Beach. It is a beach break which ensures a safer surfing experience than a rocky underground. At the same time it’s often vulnerable to weather changes, because storms, strong winds and big swells can shift the sand banks which can cause the waves to break inconsistent.
Point and Reef Breaks tend to be more consistent, however they are more suited for more advanced surfers.
Due to the rocks it is more difficult to get out to the wave and the reef can be sharp and cause injury if you wipe out.
Here in Mossel Bay we’ve got a point break as well. Occasionally the older, more experienced Surfer Kids get a chance to surf at The Point in Mossel Bay to broaden their surfing horizon as well as improve their surfing skills. Unfortunately this isn’t possible as often as we’d like because we are not capable to afford transportation on a regular basis.
We hope that you found our surf tips useful! We use surfing to transform the lives of the children in our Core Surf Program. We understand the transformative power of the ocean and we hope that you can draw inspiration from this and use our surf tips to get out there and experience the magic of surfing! It can change your life.
If you've appreciated this information, please consider reading more about our Core Surf Program and about our organization.
And please consider making a donation to support the work that we do.
